How To Do A Hip Thrust

February 8, 2023

When you think of powerful, muscle-building compound exercises for your lower-body, what comes to mind? Perhaps squats, deadlifts or lunges?
You’d be right, but there’s one you’ve forgotten - the almighty hip thrust.
Here’s everything you need to know about why they’re the perfect exercise to level up your strength, everything you need to perform them safely, plus the common pitfalls and mistakes you don’t want to make.
What muscles do hip thrusts work?
Hip thrusts are a great compound exercise, meaning they engage multiple major muscle groups at one time and deliver great bang for your buck during a workout!
Because they also use some of the biggest, strongest muscle groups in your body such as your hamstrings and glutes, along with your quads, lower back and core, they also allow you to lift a lot of weight and make significant gains on your strength and overall athletic performance.
What are hip thrusts good for?
Beyond improving your performance and giving you increased strength for your workouts, having a stronger, stable lower body and back (aka your posterior chain) is going to benefit you in all your daily activities - whether it be walking, standing, jumping, squatting, climbing stairs or running.
Building your strength through hip thrusts can also support better posture, not to mention the satisfying feeling when you achieve a new PB!
Research from 2021 on the activation of the gluteus maximus during back squats, split squats and barbell hip thrusts found peak glute activity was higher in hip thrusts than squats, suggesting this movement is a top choice if you want to train this muscle group.
Another study from 2019 compared muscle activities between back squats, Romanian deadlifts and barbell hip thrusts and produced similar findings. The researchers concluded the barbell hip thrust elicited the highest glute activity, even without the need for a maximum weight load to be added.
Hip thrusts can also be a great option if you’re someone who wants to build strength and load up your weights but struggle with barbell squats due to issues with your shoulders, neck or lower back. Similarly, if you’ve become confident with glute bridges, a weighted hip thrust is your next challenge to work your glutes and lower back that little bit harder.

Glute bridge vs hip thrust
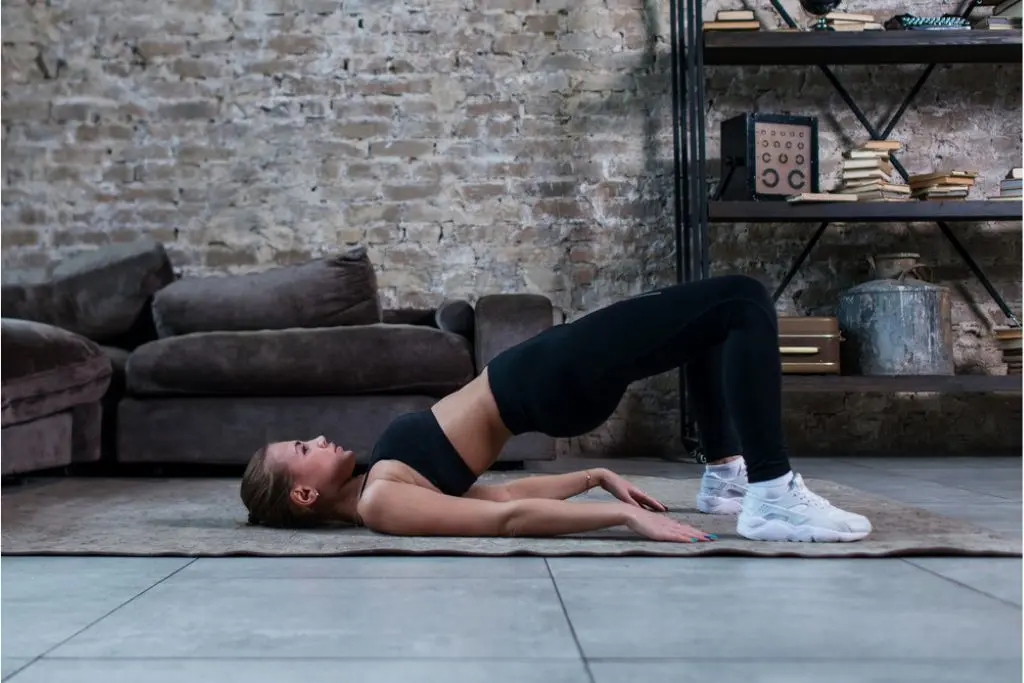
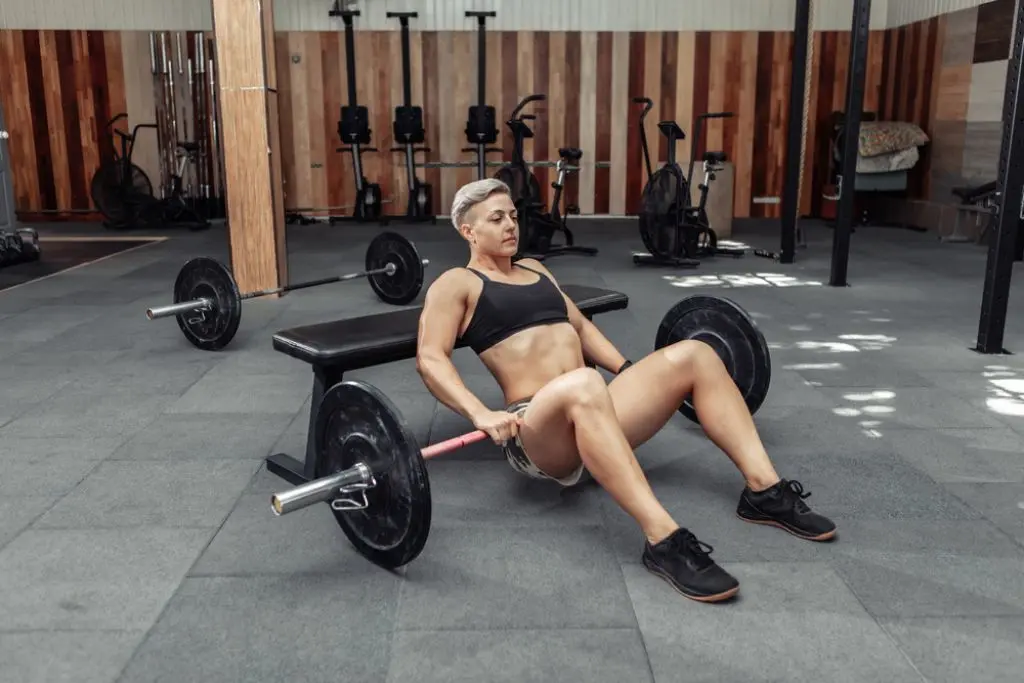
Although these two exercises work largely the same muscles, the key difference is the equipment and body position. Glute bridges are typically performed lying on your back with either your bodyweight or a light weight resting on your hips, while hip thrusts are typically performed using a bench and a barbell.
What does that mean for muscle activation and benefits? Well, because your shoulders are raised for hip thrusts, you have a greater range of motion, therefore get more hip flexion and greater activation of your glutes and posterior chain. You can also add far more weight to a hip thrust than a glute bridge - meaning more significant strength gains!
If you have limited strength or range of motion in your hips, you may need to work on this with hip exercises and glute bridges before progressing to hip thrusts. Sweat programs that incorporate hip thrusts include Strength & Sculpt, BUILD, PWR, Lifting At Home, and Strength & Resistance.
What you need for hip thrusts
Although hip thrusts can look intimidating at first - and it’s a great idea to master this exercise with your bodyweight before progressing to a light weight and then a barbell - the equipment required is very simple:
A weights bench or a stable platform, no higher than your knees
A barbell
Weight plates and barbell collars to secure the plates
A barbell pad to protect your hip bones from the pressure of the weighted barbell - without it pad it can become uncomfortable
How to do a hip thrust
Start by positioning your bench or platform with enough space for you to sit in front of it with your legs extended - it’s best if you can put it up against a wall or solid surface to ensure it doesn’t move during your lifts.
Position your barbell perpendicular to the bench with some space between for you to sit down (so the barbell and the bench form a T).
Sit on the floor with your back against the bench and your legs extended straight underneath the barbell.
Bend your knees so your feet are flat on the ground and position the barbell so it’s resting centred in your hip crease. If you’ve added weight plates to your barbell, you’ll be able to move it into position by rolling it. If you’re using a barbell alone, you’ll need to lift it into place.
Holding the barbell on either side of your hips with an overhand grip (palms facing the floor), push through your feet, drive your back towards the bench and squeeze your glutes to push the barbell up until your torso and thighs are parallel to the floor.
Keep your eyes looking down your body towards the bar and your chin tucked to protect your back. Remember, you’re holding the bar with your hands to steady it, not to lift it.
Pause for a second at the stop, squeezing your glutes, then lower your hips and the bar slowly back down with control.
After your first rep, you might need to make some adjustments to where your feet, barbell or shoulders are positioned to get the most out of your remaining reps. When your hips are fully extended, you should have a 90-degree bend at the knee and your body in a straight line from shoulder to knee.

Common hip thrust mistakes
As straightforward as the movement itself is, there are several form errors that can easily alter how effective the exercise is or increase your risk of injury.
Neck and back: At the top of your hip thrust, it’s easy to overextend your hips and push them above your knees at the top of the lift, creating an arch in your back. This is when you start to feel pain (either during or after the exercise) in your lower back. To prevent this, keep your core muscles tight, tuck your chin down to your chest with your eyes looking towards the barbell throughout the movement, and focus on performing the movement with control rather than momentum.
Foot placement: How close or far away your feet are from your body can affect which muscles are used more and how your hip thrusts feel. If you’re feeling the exercise more in your quads than your glutes, your feet might be too close to your hips which can create pressure on your knees, too. If you’re feeling it more in your hamstrings than your glutes, your feet might be too far away from your hips. Your feet should be in a position where your knees are at a 90-degree angle at the top of the lift.
Weight: Yes, barbell hip thrusts can allow you to load up a significant amount of weight, but you’ll be shortchanging yourself if you can’t push the barbell to full extension, or are increasing the pressure on your lower back. If you can only push the bar part way up or you’re feeling it in your back, lower the weight and see if that helps. If you have tight or weak hips, it’s best to work on exercises to build your hip strength and flexibility first.
Speed: A common hip thrust mistake is to move through the exercise too quickly. Many people thrust quickly with momentum then lower their hips back to the ground with minimal control, thinking the only important part is the thrust. To get the most effective hip thrust, focus on moving with control throughout every part of the movement, squeezing your glutes at the top and slowly lowering back down. This will keep your glutes engaged from whoa to go.
Hip thrust progressions
Want to incorporate hip thrusts in your workout routine but don’t feel like you’re quite ready yet? No problem! You’ll get there in no time at all. In the meantime, the best way to build your strength and confidence with the movement is to start with glute bridges. You can perform bodyweight glute bridges, then add weight, before progressing to bodyweight hip thrusts on a bench, then barbell hip thrusts. New to glute bridges? Here’s how to get started.
Start by lying flat on your back on a yoga mat. Bend your knees and position your feet firmly on the mat, ensuring that they are hip-width apart and your spine is in a neutral position. Allow your arms to rest by your sides on the mat.
Engage your core by drawing your belly button towards your spine, then press your heels into the mat, squeeze your glutes and raise your pelvis off the floor until your body forms one straight line from chin to knee, resting on your shoulders.
Lower your pelvis to return to the starting position. Repeat for the specified number of repetitions.
Hip thrusts are a fantastic way to build your glute and lower body strength, especially if you get a kick out of seeing your weights increase!
Looking for a strength training program? Check out the full line-up of Sweat programs here.

A more empowered you starts with Sweat, and our editorial team is here to bring you the latest fitness tips, trainer recommendations, wellbeing news, nutritional advice, nourishing recipes and free workouts.
* Disclaimer: This blog post is not intended to replace the advice of a medical professional. The above information should not be used to diagnose, treat, or prevent any disease or medical condition. Please consult your doctor before making any changes to your diet, sleep methods, daily activity, or fitness routine. Sweat assumes no responsibility for any personal injury or damage sustained by any recommendations, opinions, or advice given in this article.
Fitness